Creating Custom Animation Shapes
CarSim, TruckSim, and BikeSim allow you to import custom animator shapes of vehicles that are saved in supported file formats. Once you have a valid vehicle shape, it is rather easy to incorporate the shape into a CarSim run; the more difficult part is obtaining or creating a 3D vehicle shape. This page will attempt to point you in the right direction to begin creating or obtaining custom shapes that can be used in CarSim and give you a few tips about setting up the model in CarSim. The methods used for CarSim also work for BikeSim and TruckSim.
Obtaining a Shape
If you are not looking to create a vehicle from scratch yourself, there are several websites which allow you to purchase previously created vehicle shapes. The cost of one of these vehicle shape downloads can range from being completely free to costing a few hundred dollars. Below is an example websites that sell 3D models, but a quick search engine query will come up with many more.
Even if you purchase a vehicles shape from a website, it will probably be necessary for you to make at least a few modifications to the shape. There are a couple of things to look for when searching for good vehicle models, which will minimize the number of modifications you will need to make. First, you want the vehicle model to be made to be "game-ready" or "low-poly." Some 3D models are made for high-resolution, complex scenes. These models are created with a lot of unneeded detail that would excessively slow the animator. You want to find a vehicle shape that indicates that it was created for a gaming engine or has a polygon count lower than 15,000 polygons (or triangles). This will save a lot of manual editing of the shape on your part. Second, you want to make sure that you are able to use the file type that the vehicle shape is provided in. CarSim allows you to use the Wavefront Object (.obj) file format. If the shape that you want is not available in the Wavefront Object format, there are many programs that will import other file formats and export the model as an .obj.
3D Modeling Programs
In order to modify (or create) a vehicle shape, you will need a 3D graphics program, which allows you to export to your shape as an .obj file. The cost of these programs can range from being completely free to costing several thousand dollars. As you might expect, in general, the more expensive programs give you more capabilities; however, it may be the case that you would never use these capabilities anyway. Listed below are a few programs that you can look into. NOTE: Not all of these programs have been tested with CarSim.
Programs |
||
|---|---|---|
Each of these programs is slightly different, and will require a bit of learning to become efficient with. Many of these programs have free tutorials and helps available on their website. ZModeler, for instance, was designed for the purpose of creating vehicles for game engines and has several applicable tutorials available for download.
Modifying Shapes for CarSim
If you have purchased or downloaded a vehicle shape, you may still need to make changes to the vehicle using one of these programs. For instance, in order for CarSim to allow the wheels of a vehicle to rotate, the wheel shape needs to be exported as a separate file than the car body. Many models may have all of the objects in one file, so this is where a 3D modeling program will come in handy.
When exporting your shapes for CarSim, you may also need to scale, rotate, or reposition your model. Most 3D modeling programs make these operations relatively simple.
Scaling
When you obtain a model, you may have to scale the entire model to make it the right size in CarSim’s animator, The Visualizer. The Visualizer interprets a length of 1 unit as 1 meter. If your model was created using a different unit system, you can either scale your model in CarSim or use your 3D modeling program to scale your model to an appropriate size.
Rotating
To make sure that you model travels down the road oriented in the correct direction, you need to rotate your vehicle to the appropriate coordinate system. If you were sitting in the driver’s seat of your model, you should be looking in the positive X direction, have the positive Y direction on your left-hand side, and have the positive Z direction extending above your head. If this is not how your model was set up, you will need to rotate it. For the wheel shape, position the wheel such that the front face of the wheel is in the XZ plane and facing the negative Y direction.
Positioning
Finally, to ease the integration of your model into CarSim, you will need to position your vehicle and wheels around the correct point of origin. For a vehicle, position the middle of the front axle at the origin, with the appropriate ground clearance. For a wheel, position the shape centered at the origin.
Once you are satisfied with your model, you can use your 3D modeling program to export the vehicle and wheel shapes as an .obj file.
Final Setup in CarSim
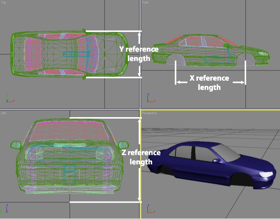
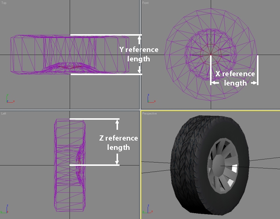
Once you have your .obj files, you are ready to set them up in CarSim. Navigate under the "Library" menu to "Animator->Animator: Shape File Link." Create a new dataset, and give it an appropriate name. On this screen you will be able to link to your newly created file, change its color, turn on dynamic shadows, etc. In addition to these settings, it is important to set the reference length fields to an appropriate size (Note: if you have several files to link together, use the "Group" and set the reference lengths on that screen). The reference lengths are used by the Visualizer to scale the vehicle shape to the correct size of the vehicle model you create in your CarSim dataset. In order to determine the correct values for each of the reference lengths, you will need to get the dimensions of your model from your 3D modeling program. The figures on the right show the dimension that each reference length represents. Once you have the reference lengths set, you are ready to begin using your vehicle model in your dataset!
Animation Shapes
3D Animator Shapes (PDF)Using 3ds Max to Make Shapes (PDF)
VehicleSim Products
CarSimTruckSim
BikeSim
SuspensionSim
Built-In Features
ADAS: Moving Objects and SensorsAnimation and Plotting
Automation and COM
Built-In Controllers
GUI, Database, and Documentation
Modular VS Math Models
Paths and S-L Coordinates
Roads and Terrain
VS Commands Language
VS Scene Builder Tool
Co-Simulation Technologies
Real-Time HIL SupportSimulink, FMI/FMU, LabVIEW
Unreal Engine
VehicleSim SDK
More
Engineering ServicesOrigin location for vehicles (top) and wheels (bottom).


